Showing posts with label low carb. Show all posts

Crispy Duck Breast

Sunday, October 6, 2013


Crispy Duck Breast

Preheat your oven to 175C Fan-forced

Take your duck breast out of the fridge and let it sit at room temperature for 20 minutes.  Do not trim any of the fat if you want yummy crispy duck skin! Score the skin with a knife and make sure you cut only the skin and not the meat.  Season well with Salt and Pepper.  

In a skillet place the duck skin side down and as the skillet heats up the fat starts to render.  You don't need the skillet to be pre-heated, it's actually better if you put the duck into a cold skillet.  As the fat starts to render you can drain it into a container before it gets too hot.  As soon as the heat gets really high and the skin gets crispy the duck fat will turn a different colour so it's still ok to use as leftover cooking fat but not the clear white duck fat you buy from a butcher.

Let the duck breast get nice and crispy as pictured above but do not burn.  Once crispy then turn the breast and cook for about 2-4 minutes on the meat side.  Then place into the oven and bake for 6-7 minutes.  Once cooked remove the duck breast from the oven and rest for 10 minutes.  Slice and serve with whatever your heart desires, if you eat potatoes then I highly recommend making duck fat potatoes, you will never want to eat potatoes another way once you fry them in duck fat!


Walnut Pesto

Wednesday, September 11, 2013


This works best with freshly cracked walnuts!


  • 1/3 cup Walnuts 
  • 2 cups Fresh Basil 
  • 2-3 cloves of garlic 
  • 1/3-1/2 cup Olive Oil 
  • 1 Tablespoon Lemon Juice 
  • Freshly cracked Pepper 
  • Salt to taste (1/2-1 teaspoon) 

Place all ingredients in a food processor and blend until combined. Leave in fridge for at least 1 hour so all the flavours marinade together before using.


Whipped Coconut Cream


I think you all will love this! Whipped Coconut Cream, yes you can whip coconut cream much like you do with normal cream.

Here I served mine with fresh pineapple and toasted coconut chips on top! I have also made it into Chocolate mousse and it's really amazing.

I buy the Kara Coconut Cream but any Coconut Cream will work, so long as it's the cream not the milk. Keep it in the fridge for a day or place it in the freezer for 30-60 minutes. It needs to be chilled before you even attempt this otherwise it won't hold it's shape
  1. Use a large bowl
  2. Open up the Carton or Tin and scoop out the most solid part of the cream, it will produce a stiffer whipped cream. 
  3. Beat cream until it forms soft peaks, it should take about 4-5 minutes using electric beaters.
  4. The addition of Vanilla is amazing!
  5. Will keep refrigerated well
You are welcome ;)

Grassfed Ghee

Tuesday, September 10, 2013


The best ghee is made from pasture fed cow’s milk. It's really hard to find good quality ghee in my home town.  So I've decided to make my own. Ghee can be heated to higher temperatures without burning, it also doesn't contain dairy which can be problematic for a lot of people.  I'm doing a Whole30 at the moment and I just love butter so for me it just made sense to make myself ghee.  I would go so far to say is that I find it superior to butter for cooking, sautéing etc...
  • Unsalted Butter - grassfed or pastured
  • Thick bottom saucepan (I used copper bottom and stainless steel)
  • Ladle
  • Glass jar with airtight lid
  • Tea Strainer
You do need a little patience when making Ghee.

Place your butter in your saucepan and gently heat so the butter melts very slowly - you do not want to burn the butter otherwise you will ruin it.

I used the Lewis Road Creamery Unsalted Butter from pasture-fed cows in New Zealand.


Once the butter has melted you can turn up the heat but not too high, you want it to be bubbling but not too rapidly.


As the butter boils the milk solids will begin to separate, start to skim off the milk solids as this happens.  This process takes about 20 minutes but do not walk away! Keep a close eye on it.


Once you have had it boiling for about 20 minutes, it's different for different amounts of butter, here I've done a batch of 750gms of butter.  Strain the ghee through a tea strainer so that any of pieces are left at the bottom don't end up in your finished product.


Ghee should be stored at room temperature, not refrigerated. Ghee will turn rancid if it is exposed to oxygen for too long.


You will be left with beautiful liquid gold! This stuff is really amazing and you will not regret the time it takes to do this!


Zucchini Carbonara

Tuesday, September 3, 2013


This is one of my favourite dishes:

Ingredients:

Serves 2:
  • 1 large breast of chicken chopped up into bite sized pieces 
  • 4 strips of streaky bacon chopped up 
  • 5-6 large sundried tomatoes chopped up 
  • 75gms Creamy feta (more or less depending on your taste preference) 
  • Handful of Toasted Pinenuts 
  • 100-200mls Heavy Cream 
  • 2 Egg Yolks 
  • 2-3 zucchinis julienned 
  • 1 Tbsp Basil Pesto 
  • Knob of butter 
  • Garnish: Freshly Grated Parmesan Cheese and Salt & Pepper

Instructions:

First toast your pinenuts!
Then fry your bacon, once browned put aside, fry the chicken using the bacon drippings. Once the chicken is almost cooked throw back in the bacon, sundried tomatoes and pesto.

In a bowl add your egg yolks, cream salt and pepper. Add the wet mixture and let simmer on a very low heat, you don't want the egg to curdle. Only cook for about 2 minutes. Add your feta and take off the heat.

In a separate non stick frying pan melt a knob of butter and flash fry the zucchini, you don't want to do it for long otherwise your zucchini will go mushy, add the zucchini noodles to the creamy chicken and serve immediately, grate some fresh parmesan on top and some freshly cracked pepper and salt.

Warning: Super rich!!!

Honey Mustard Chicken and Parsnip Purée!

Friday, August 30, 2013


Honey Mustard Chicken


  • 2 Skinless Free Range Chicken Breasts
  • 1 Tablespoon Raw Honey
  • 1 Tablespoon Wholegrain Mustard
  • 2 Tablespoons of Cream or Coconut Cream would probably work well.


Preheat your oven on fan grill to 200C.
Mix honey, mustard and cream with a dash of salt and pepper to taste and combine well, toss the chicken breasts in the mixture and marinade for a at least 15 minutes (the longer the better), grill them for 10 minutes on each side and then turn down the oven to 180C and change to fan bake for a further 10 minutes.  Rest for 10 minutes.


Parsnip Purée


  • 200gms Parsnip (peeled and remove the woody core)
  • 500mls Chicken Stock
  • 2 Tablespoons of Butter (preferably grass-fed)
  • Salt and Pepper to taste
  • Dash of cream


Chop up your parsnip and place in a pot, pour in the entire 500mls of chicken stock and boil for 15 minutes, watch closely as you don't want it to burn, it should use up most of the liquid with only a little bit left in the bottom.  Remove from heat and add in your salt, pepper and butter and use your immersion blender to blend it nice and creamy.  Once you are ready to serve it then place it back on the stove to heat it through again and add your cream.  

Serves 2


Maintaining my weight loss

Wednesday, August 14, 2013

When I started my journey back in 2008 I had so much drive, so much focus and the absolute desire to shed 40 odd kgs.  So here I am almost 5 years down the track and while I’ve keep the weight off (give or take a few kgs) I will share with you why I think it’s much tougher to keep the weight off, ok I’ll rephrase that, things change and while it may not be tougher it takes a different set of skills.

The beginning of my journey started on October 2008, I had finally decided that I was sick and tired of being sick and tired...overweight, out of shape, unhappy and generally I just felt so unattractive and uncomfortable in my body.  I didn’t feel like it was my body anymore, nor did I feel like the person staring back at me was me, it was as if I had a fat suit on and it didn’t matter what clothing I tried to wear to disguise how large I was or how long my hair got or how well I applied my make up nothing detracted from how I felt emotionally.  When those comments of wow you have  amazing hair were just far to frequent you start to realise that it’s the one thing people will compliment you on because they aren’t going to say how amazing you look because the truth is I didn’t look amazing.  I was smiling on the outside but on the inside I was downright miserable and couldn’t wait to be rid of the extra fat I had acquired, I had let my body define “who” I was.

The first thing that I changed was my diet.  After reading everything I could get my hands on I realised that to lose a substantial amount of weight you need to change the food, 80-90% of your results will come from your diet.  While exercise will help shape your body and make you feel mentally amazing, it’s a pretty poor way to try and lose a LOT of weight.  The old mantra of burn x amount of calories is not going to get you that far – well it didn’t for me.  What’s the best way to work up an appetite? Go for a run!  Simple answer is that high intensity cardio exercise will increase your appetite.  Lifting weights is where it’s at; bodyweight exercise is also very effective.

I dove head first into it and threw out everything in my house that resembled unhealthy and loaded up with what I knew was going to work.  I had done low carb in the past so I had a fair idea of what sort of things I could have but this time is was going to be a far more healthy version of low carb.  In my mind low carb had worked a charm last time but I just hadn’t embraced veggies enough and lived off diet coke.  This time I had the fridge full of fresh veggies, fruit, meat, chicken, eggs, high fat dairy and in the cupboard were a few cans of tomatoes, olive oil, nuts, soda water, herbal teas etc..

It didn’t take long to start dropping the weight and I soon figured out what my sweet spot was for weight loss....Higher fat, moderate protein and low carb.  The weight was dropping off easily a kg a week and kept that momentum for just over a year, the lower in weight I got I would determine that I needed less food and just adjusted accordingly.  I started blogging to keep some accountability as I was the ONLY one at the time I knew of that was doing this “crazy farfetched” style of eating.  People around me thought I was nuts and honestly I just lived like a bit of hermit while my ‘job’ was to lose weight.  I was unemployed for several months as I had just lost my job to a redundancy, it was when the recession first hit and it was a bit of a blessing in disguise.

I was very lucky to have the support of my loving husband who allowed me to focus on losing the weight while trying to come up with a way to start my own business.  It only took one month to decide to start my business altering and repairing clothing with my 2 domestic sewing machines, I had a small sandwich board out the front of our house and during my lunch breaks I would flyer drop.  I started to get a name for myself and plenty of long hours and hard work I can happily say that it’s been almost 5 years on am I’m going stronger than ever, I have 5 industrial sewing machines and a very steady stream of repeat customers, my business is what I would finally call successful.

Initially when I first lost all my weight I think I was just so bombarded with compliments of “OH MY GOD YOU LOOK AMAZING!!!” How can you not be on cloud nine with amazing comments like that?  They lasted about a year and anytime I saw someone I hadn’t seen since I’d lost my weight.  This is a very rewarding part of weight loss, however as time goes on people just get used to you and the comments stop and I guess well you are just normal.  Now don’t get me wrong normal is nice but those compliments are a huge driving force to keeping you strict and after a while you need to find what it is about your “new you” that will keep you maintaining your weight? I can’t answer this question for you personally but I know for myself that while yes I have fluctuated a wee bit, I have kept most of my weight off.  The biggest non vanity reason for that is because of my health, I have suffered with Anxiety, Depression, PCOS, Menieres Disease and all sorts of other issues that didn’t reduce until I lost the weight and ate Primal.  I don’t know if it was the weight loss or the Primal eating that has been the driving force in keeping these health problems at bay but what I do know is that for 6 months while I wasn’t eating very primal and gained 5kgs the majority of my health issues came back with a vengeance.  I’m finally back on track and the weight is slowly coming back off and my symptoms are starting to dissipate again.

Now 5 years on I have done my fair amount of experimenting with diet, what worked for me 5 years ago doesn’t seem to work for me now, I need more carbs to feel healthy and sleep well.  That doesn’t mean that I subscribe to a high carb diet but I would say that having 50-100gms of carbs a day is where I feel best.  For years I felt fine on below 50gms, now that amount seems to not have the desired effect.  This is where I cannot emphasise enough about experimenting with your diet, calorie amounts, macro nutrients and only you will be able to figure out where you sit on the spectrum, we are all so individual and I see Primal as a template not a set in stone prescription.  

One of the greatest things that has come from all of this is to realise how passionate I am about food, cooking is my therapy and without discovering primal I may not have realised this.  It has reignited the joy I have to sit down to my meals and nourish my body, I’m not about deprivation hence why I could never do a regimented program, my personality doesn’t suit that kind of restriction.

The discipline it takes to lose weight is half mental, visualisation is powerful, it might sound cheesy but every night before I went to sleep I would visualise that one day soon I would wake up and be able to go to my wardrobe and pick out anything I wanted to wear for that day, hey I love fashion so that was a big driving force for me.

Don't underestimate the power of visualisation, combine that with a way of eating that feels natural and relatively effortless and you having a winning combo. I ate to my hunger levels and it felt right, my body responded so well to Primal and almost 5 years on it still feels right.

Cajun Prawns with Cauliflower "Rice"

Sunday, August 11, 2013

Ingredients
  • 1/4 head of cauliflower
  • 1 zucchini diced
  • 1/2 red capsicum
  • 1/2 spring onion diced
  • 150gms Prawns
  • Fresh Coriander/Cilantro
  • Fresh Ginger grated
  • Handful Salted Cashews
  • Lime Juice 
  • Chicken Stock
  • Greggs Cajun Seasoning 
  • Coconut oil for frying
Instructions
  1. Heat your coconut oil in a pan and saute zucchini, peppers and onion
  2. Roughly chop your cauliflower and pulse in your food processor until it resembles 'rice', add in your cashews, cilantro and ginger and quickly pulse, do not over pulse or it will turn into a paste.
  3. Once veggies are almost ready add your cajun seasoning and prawns and cook for about 5 minutes. 
  4. Add in a little bit of chicken stock and cauliflower and cook for a couple of minutes.
  5. Remove from the heat and stir some fresh lime juice and a little extra fresh cilantro.

*This will also work well with chicken

Homemade Mayonnaise

Wednesday, July 24, 2013


Mayonnaise
  • 2 small egg yolks (or 1 large)
  • Fresh juice of one small lemon or a capful of wine vinegar
  • 1 tsp Dijon Mustard
  • Extra light Olive Oil

Combine egg yolk, lemon juice, dijon mustard, salt & pepper in a medium bowl.

Use egg beaters as its easier, beat for about 30 seconds first and then start to add the oil very very slowly while beating constantly, the first part is vital or it won’t emulsify properly.

It will start to thicken and the more oil you add the thicker it will become, you need about ¾ cup of oil, once you’ve done the first part then you can pour the oil in a steady stream.

Once thickened add 1 Tbsp Boiling hot water, cover and keep chilled, will keep for 1 week as it cooks the egg.

Add wasabi paste to the mayo to make wasabi mayonnaise, adjust amount to your preference, I generally use 1 tsp to about 5 Tbsps Mayo.

Add 1-2 finely diced or grated garlic cloves to make Aioli.

*I use the immersion blender now and it's much faster! I will update this post to show how to do it or you can google youtube Immersion blender mayo, same ingredients :)

Almond & Coconut Chicken!!! "Extra Crispy Chicken"


Ingredients

  • 2 chicken breasts (boneless & skinless)
  • 3/4 cup ground almonds
  • 3/4 cup unsweetened shredded coconut
  • 1/2 tsp salt
  • 1/2 tsp celery salt
  • 1/4 tsp freshly ground black pepper
  • 1/2 tsp garlic powder
  • 1/2 tsp onion powder
  • 2 eggs beaten
Directions
Slice your chicken breasts in half so you have two flat 1 inch thick pieces out of 1 chicken breast. (4 all up if cooking 2 chicken breasts)

Combine almonds and seasoning in a bowl. Whizz up your coconut to make it fine or leave chunky - the choice is yours!

You'll need 1 bowl for the eggs and 2 large places: one for the almond mixture and 1 for the coconut.

Dip all the chicken  in the eggs and coat thoroughly, then coat with the almond mixture, then coat again in the eggs, final step is to coat with the  coconut, the two coatings make for some 'fried chicken' tasting chicken and extra tender!


Line a baking dish with baking paper and place your chicken.
Bake at 180 Celsius for 30 minutes, flip chicken halfway through. 


Serve hot!


This salad goes awesome with this chicken:  
Julienne about 1/2 a cucumber, slice your green onions (spring onions), chop fresh basil and coriander (cilantro), toss them all with mesclun or spinach greens or both! Add the juice and zest of 1 lemon, 1-2 tablespoons of olive oil, salt and freshly ground pepper!

Almond Crackers

Sunday, July 21, 2013


1 ¾ cups blanched ground almonds
1-2 tablespoons Masterfoods Italian or Tuscan Seasoning
1/2 tsp Salt
1 tablespoon olive oil 
1 egg 


In a large bowl, combine ground almonds, salt and seasoning


In a medium bowl, whisk together olive oil and egg 


Stir wet ingredients into almond flour mixture until thoroughly combined 


Roll the dough into a ball and press between 2 sheets of parchment paper to ⅛ inch thickness 


Remove top piece of parchment paper 


Transfer the bottom piece with rolled out dough onto baking sheet 


Cut dough into 2-inch squares with a knife or pizza cutter 


Bake at 170C for 12-15 minutes, until lightly golden 


Let crackers cool on baking sheet for 30 minutes, then serve 


Yields 24 crackers 


Original recipe here:

Coffee Cake Muffins - Grain Free

Saturday, July 20, 2013


I adore coffee cake and the flavour of these are really great!

Ingredients:

  • 1/4 cup almond flour
  • 1/2 cup coconut flour sifted
  • 1/4 tsp of baking soda
  • 1 tsp ground ginger 
  • 1/2 tsp ground nutmeg
  • 1 tsp ground cinnamon
  • 1/2 cup coconut oil, melted
  • 1 cup strong coffee brewed
  • 6  eggs
  • 1/2 cup coconut sugar, maple syrup or honey

Directions:
Preheat your oven to 170C
In one bowl melt the coconut oil, then brew your coffee and add the coconut sugar to that so it dissolves.
Once all has cooled add your eggs and beat mixture. 
 In another bowl combine all the dry ingredients well and then combine wet and dry and whisk together well, mixture should be runny.


Pour into a glass Pyrex jug so you can easily pour into muffin cups, once filled all 12 then bake for 25-30 minutes. 


These taste pretty great and are best once they are cold, the texture improves after a while!

Roasted Broccoli!

Wednesday, July 10, 2013


This is god damn delicious! I sort of thought it wouldn't be as good as cauliflower but it is just as good if not better :)

Head of Broccoli
2 Tbsp's of Coconut oil, lard or tallow
1-2 Tbsp's Pinenuts
2 Tbsp's Parmesan cheese
2 cloves garlic
Lemon rind & juice
2 slices of bacon
Lemon Olive oil 
Salt & Pepper

Preheat your oven to 220 degrees C.
Cut the broccoli florets from stalks, discard most of the stalks, only leaving enough to keep the florets in tact. 

Using an oven dish melt your coconut oil in the oven so you can evenly distribute the oil over the broccoli.  Toss the broccoli with salt and pepper and toss through the oil using tongs. 

Roast for 20 minutes, (but at 10 minutes just give them a little flip so they cook evenly). At the 15 minute mark add some grated garlic, if you add it earlier it will likely overcook, once cooked the broccoli  should be browned and crispy!

While your broccoli is cooking toast your Pinenuts in a non stick pan on a very low heat, watch constantly as they will burn if you leave them, only takes approx 2-3 minutes to brown. Chop up the bacon and cook that up also. Grate your Parmesan cheese and the rind of 1 lemon.

Once cooked remove the broccoli from the oven and in a bowl add the Pinenuts, bacon, Parmesan, lemon rind, and just a small squeeze of lemon juice. Once served drizzle with lemon olive oil.
Eat while its hot!


Meniere’s Disease

Tuesday, July 9, 2013

Over 7 years ago I didn't work at all because I felt severely bad ALL THE TIME! I've struggled with vertigo/dizziness (panic attacks because of it) since I was 8 years old, I remember my first Vertigo attack after an extremely stressful family holiday (to cut a long story short my father is an alcoholic and manic depressive since I was 3 years old).  Suffice to say a lot of my childhood wasn't always pleasant. Over the years I've certainly had my fair share of health problems.  The past few weeks I've had a flare up of it all over again.  Most of the women in my family have had bouts of vertigo, my nana, mother, aunty, sister and cousin have all experienced it in varying degrees.

I've just been to see my doctor and he has confirmed what I always suspected is that I do have Meniere’s Disease (you can read about it here: http://vestibular.org/menieres-disease) simply put it is excess fluid in the inner ear and causes attacks of vertigo (spinning dizziness), nausea (sometimes vomiting) and leaves me incapacitated for hours and sometimes days on end– hence my issues with flying, boats, heights, lifts, escalators, elliptical machines, treadmills etc etc.. He explained about how the fluid volumes in the inner ear are affected by the hormonal and electrolyte balance of the fluids in the body. To restore function and overall manage my symptoms I need to keep my insulin levels low and as steady as possible. So the more consistent I can keep my insulin levels and my sodium levels the less fluctuation there will be in the fluid volume in my inner ears.

A couple of weeks ago I had a servere vertigo attack that lasted almost a week.  I used to get them all the time before I was primal and I had forgotten how bad I used to be and that recently I have taken my renewed health for granted. During the last 6 months I've not really been what I'd call Primal, more like a 50/50 approach (you can read about my latest post here: http://primaljourney.blogspot.co.nz/2013/07/everything-in-moderation.html) I've had a huge wake up call with regards to keeping myself healthy. 

When I eat Primal I'm about 80% free of these debilitating symptoms, the flare ups I generally have come when I've had a couple of days eating gluten, excess carbs and sugar. Also things like lack of sleep, stress and travel also exacerbate the symptoms. 

I have come to the realisation that for me personally I need to keep my carbs relatively low (50-80gms).  
It affects my neurological health and my ability to live a normal life.  I will always have Meniere's Disease as there is no cure but I can manage my symptoms with eating primal and keeping myself as healthy as possible.


Mushroom, Bacon & Zucchini Carbonara!

Thursday, July 4, 2013


Ingredients:

  • 4-5 Field Mushrooms  (use button for a milder taste and use double the amount of mushrooms if using button)
  • 3 strips streaky bacon
  • Knob of butter
  • 2 egg yolks
  • 1/4-1/2 cup cream
  • Salt & Pepper
  • 2-3 Tbsp's Grated Parmigiano-Reggiano
  • 2 Zucchinis (courgettes for us NZ'ers)

Instructions:
Dice up your mushrooms and bacon and fry in your pan with a knob of butter. Meanwhile prep your sauce: In a bowl add egg yolks, cream, s&p, grated Parmigiano-Reggiano. Put aside
Prep your zucchini: I peel mine with a tomato peeler so you are just taking off the green layer. Use your julienne peeler (see photo - mine cost $9.99NZD and came with 2 other peelers) Julienne the zucchini, here's a YouTube for instructions if you need them: http://www.youtube.com/watch?v=w1JG5rYdekU


Once the mushrooms and bacon is cooked then add in your julienned zucchini and cook for 1-2 minutes, I like mine el dente! Lower the heat on the element and add in the egg, cream and cheese mixture, ensure the pan is at a very low heat, stir constantly for about 1 minute (this prevents the eggs from scrambling). 
Take off heat and serve, add more grated Parmigiano-Reggiano if desired!
I've been having this for years and it really is really very good :)

Dijon Maple Chicken

Tuesday, July 2, 2013

Ingredients

  • 2-4 Chicken Breasts
  • 2 Tbsp's grade b maple syrup
  • 3 Tbsp's Dijon mustard
  • 1 Tbsp fresh Rosemary
  • 1 Tbsp soy sauce
  • 1 Tbsp olive oil
  • 2 garlic cloves grated

Instructions

Preheat oven to 160C (Fan Forced). In an oven proof dish stir together the mustard, maple syrup, olive oil, soy sauce, grated garlic and chopped rosemary.
Coat the chicken breasts really well and arrange in your dish so they are side by side completely covered in marinade.
Bake the chicken breast in the preheated oven until cooked (approx 45-60 minutes)


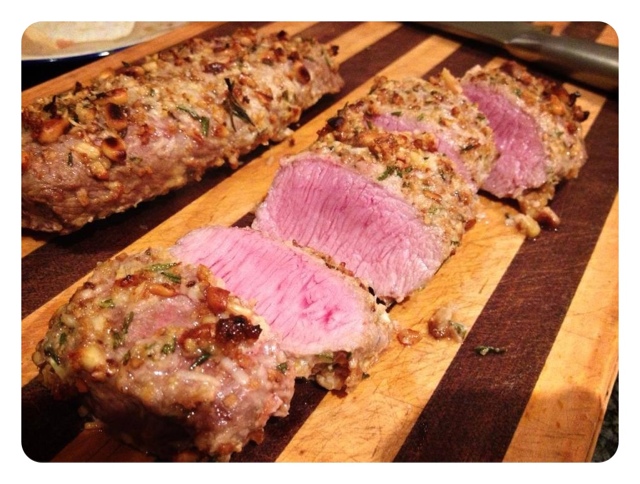
Pinenut Crusted Lamb Loin Fillets

Monday, June 17, 2013


To make the crust: 
Roast your pine nuts, once roasted put them in a mortar and pestle with the lemon rind, grated garlic, chopped rosemary together with a little salt and pepper, toss through the grated Parmesan cheese.  Coat the lamb fillets with Dijon Mustard and roll the fillets through the crust.

Place the lamb on an oven dish covered with baking paper.

Preheat oven to 240C FanForced. Cook lamb for 8 minutes ( medium-rare). Remove from the oven, let the lamb rest for 10 minutes.

All rights reserved. © The Poppy Creative.